To p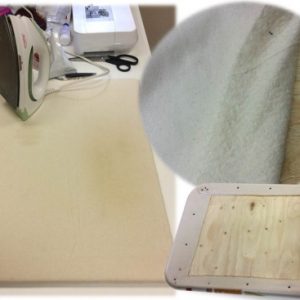 ress or not to press? That is a common question. And I believe it to be the third step in the 12 steps to successful quilt making as ironing fabrics is essential in quilting.
But beware!
Please do not iron fabrics like you would a men’s shirt. I prefer saying that we press our fabrics!
Because in reality we are crushing the fabric onto our board, there is no circular movement that could change the weft and warp and create a rainbow effect, meaning a slight curve in our strips.
Here is my little secret that surprises most of my students:
The secret is not in the quality of the iron but rather in that of the ironing board.
Many were surprised to see the irons in our classroom …. they are the cheapest you can find (listen closely! Not the expensive irons on sale for half price … those who are the least expensive all the time). Don’t judge me too quickly, this all happened one morning when I realized that another iron had been broken in our last class and I desperately needed new ones that morning so I ran to a hardware store to purchase a few in a rush and the only ones they had that morning were the cheap ones. I figured they would last for that class. Much to my surprise, the teachers enjoyed the fact that they were light and didn’t automatically shut off all the time. And as time went by, they were the sturdiest in the classroom as well.
In addition, the heat gauge is not always functional, but it is to our advantage because it is almost always at the hottest level which is usually cotton setting on these irons. And we never put water in them either. Finally, if your iron accidentally touches a fusible interfacing, you will not be too upset throwing it away.
So why all these adds that feature expensive irons with hot steam? You will need one if you decide to make miniature quilts or advanced piecing or paper piecing. If you are a beginner, wait until you feel the urge.
Some people confess that they do not iron at all, they only press the seams with their fingers. I remain skeptical …. Because I like the precision
You need a good pressing to crush down a seam. Often I see quilters trying to understand why they are missing ¼” in their finished block … I will gently open the seams and press them flat. The block will then be at the right size.
Now let’s talk about your ironing board … If you want to invest in something, then it should be that! Opt for a rigid board. Small mesh under a soft cover will not be of any help. The fabric will sink in and never touch the soleplate of your iron well enough to be pressed.
But you do not need to spend a fortune either because you can make your own at a reasonable cost. And if you are going to make your own, I suggest you make two! Go buy two wooden boards ½” thick and have them cut to size 24×24 (or 36) for pressing when piecing blocks and 24×60 for pressing the fabrics at the beginning of the project and for pressing when mounting blocks and borders. Once you have purchased your wood, add a piece of batting and then cover with a Teflon fabric. Secure with staples or nails on the back side and you’re ready for precision pressing.
And remember! No circular movement. Simply press downward.